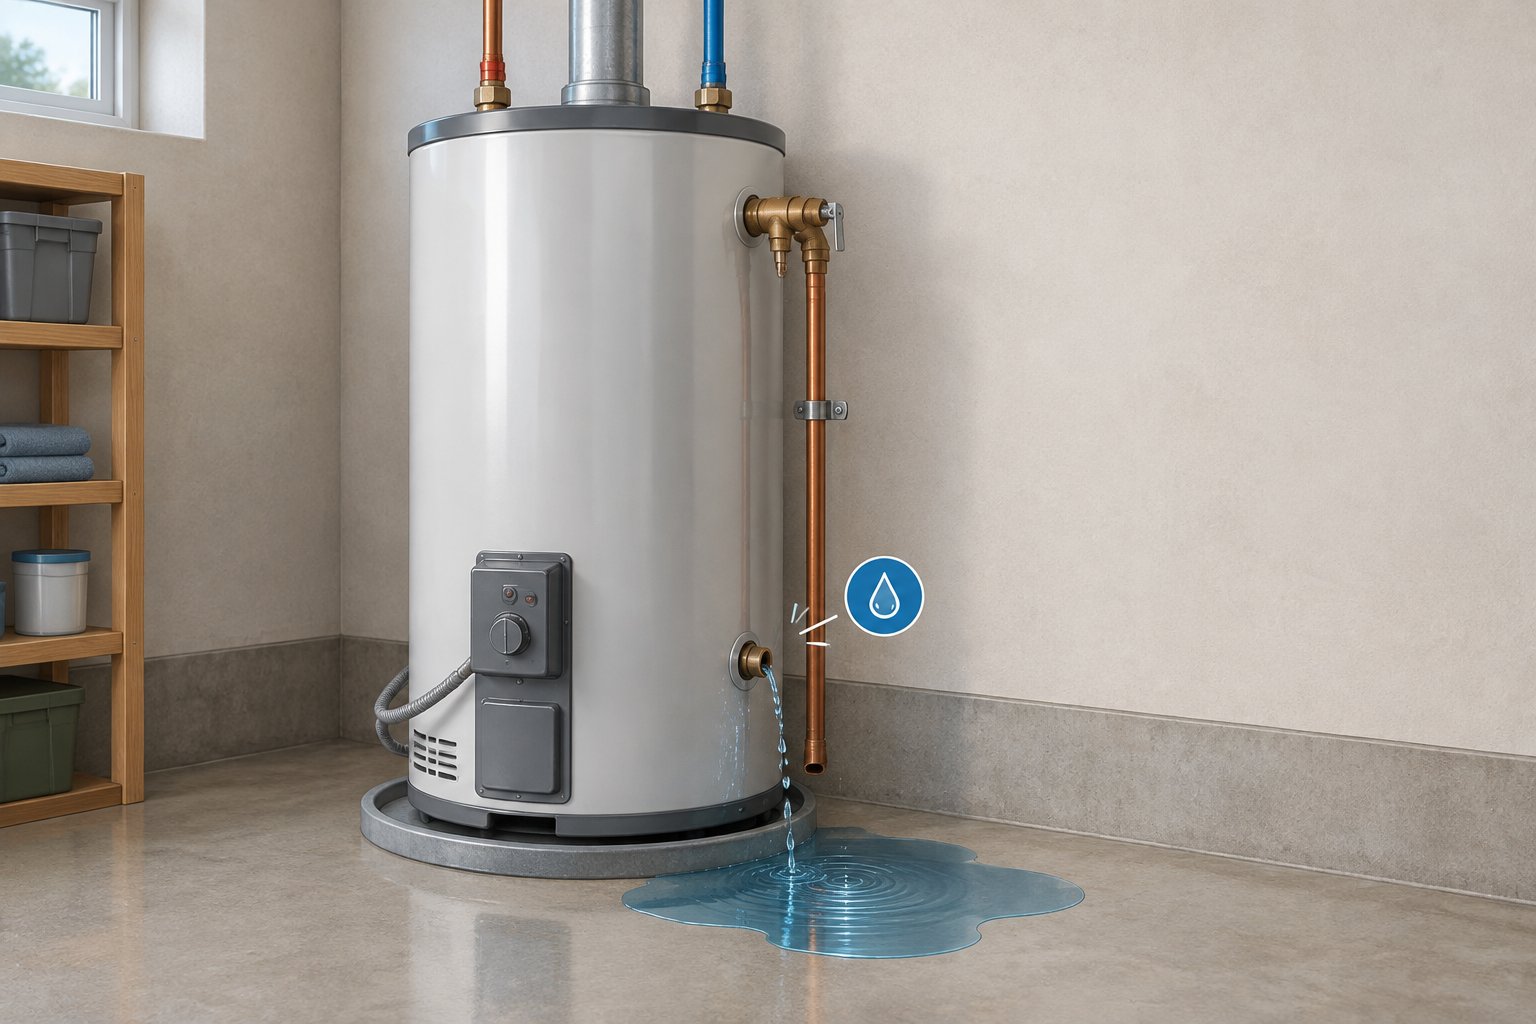
It usually starts with a soggy corner on a cardboard box in the garage, or a dark ring on the closet floor that wasn’t there last week. You trace it back, and there it is: your water heater leaking onto the concrete. The next question is the one that matters most, and the answer depends almost entirely on where the water is getting out.
A drip from a fitting on top of the tank is a routine repair. Water seeping from the steel body of the tank is not repairable at all. Between those two sit a handful of valves and seals that can be swapped out on an otherwise healthy heater. Ten minutes with a dry towel and a flashlight will usually tell you which group you’re in.
Shut Things Down Before You Investigate
A tank holds a lot of hot water under pressure, and depending on the model it's also connected to a gas line or a 240-volt circuit. Make it safe first.
Cut the energy. On an electric heater, switch off its breaker at the panel. On a gas heater, turn the control knob on the gas valve to Pilot or Off. If you smell gas at any point, skip this step entirely. Get out of the house, then phone Southwest Gas or 911 from the street.
Close the cold supply. The cold water line enters at the top of the tank, usually with a valve a foot or so above it. Turn a round handle clockwise until it stops, or a lever handle a quarter turn so it sits crosswise to the pipe. The tank can't refill, so a slow leak will slow further.
Protect the floor. Move stored boxes, lay down towels and keep pets and kids away from the area, because the water coming out may still be very hot.
If water is pouring out rather than dripping, or the tank looks swollen or misshapen, stop there and call for emergency help. Everything below assumes a drip or a slow seep.
The Dry Towel Test
Water runs downhill, and a drip at the top of a tank can trickle down the jacket and puddle at the base, looking exactly like a failed tank. So before you decide anything, wipe the whole heater dry, including the pipes on top and the floor beneath it. Then come back in half an hour with a flashlight and look for the first spot that's wet again.
A dry paper towel pressed against each fitting makes small drips easier to see. Work from the top down. The highest wet point is your source.
Water on Top: Connections and Fittings
Leaks at the top are the most forgiving kind. The usual suspects are the threaded connections where the hot and cold lines meet the tank, the short pipe stubs called nipples that join them, and the cold shutoff valve itself.
Fittings loosen with years of heating and cooling, and where copper pipe meets a steel nipple, the two metals can corrode each other at the joint. Look for green or white crust, rust-colored streaks or a bead of water that reforms on the threads. A valve that drips from its handle stem often just needs its packing nut snugged slightly.
Anything beyond that gentle tightening is better left to a plumber. Overtightening a corroded fitting can crack it, and replacing a nipple means draining the tank and working with pipe threads that may have been in place for a decade or more.
Water on the Side: The Relief Valve and Its Pipe
Partway down the side or on top of most tank heaters sits the temperature and pressure relief valve, with a pipe running from it toward the floor or through the wall. Its job is to open and dump water if the tank gets too hot or the pressure climbs too high. Water at the end of that pipe means the valve opened.
Sometimes that's the valve doing its job because pressure in the house is running high, and sometimes the valve itself is worn and won't reseat. Either way, never cap, plug or tie off that pipe. It is the tank's most important safety device. A dripping relief valve deserves its own diagnosis, and high water pressure in the home is one of the more common reasons behind it.
On electric heaters, look as well at the two rectangular access panels on the side. Water seeping from behind one points to a worn gasket on a heating element. Those panels cover live wiring, so leave them closed and mention what you saw when you book the repair.
Water Heater Leaking From Bottom: Valve or Tank
This is where the news can go either way. A water heater leaking from bottom has two possible sources, and they could hardly be more different.
The drain valve. Near the base of the tank there's a spigot-style valve used for flushing. If it drips from the spout, it may not be fully closed, or debris may be holding it open. Hand-tighten it clockwise and see whether the drip stops. A threaded cap over the spout can stop a minor drip for a short while, but a valve that leaks from its body or around its stem needs replacing. That's a standard repair, and many factory drain valves are plastic that wears with age.
The tank itself. If the drain valve is dry and the fittings above are dry, yet water keeps appearing under the heater, the tank has very likely corroded through. Tell-tale signs include rust streaks running down the jacket, flaking metal around the base, or water coming from underneath the burner area on a gas model. A glass-lined steel tank that has rusted through can't be patched, welded or sealed. At that point the conversation moves from repair to water heater installation.
Don't wait on a leaking tank. Small seeps from corrosion tend to grow, and a tank that finally splits can put a lot of water on the floor very quickly.
When It Isn't a Leak at All
A few things look like leaks and aren't.
Condensation. When the tank is refilling with cold water, moisture from the air can condense on the cold metal. On a gas heater, combustion also produces water vapor that can drip onto the burner and sizzle. Both happen most during heavy use or right after a big refill, and both stop once the tank is up to temperature. A steady drip that keeps going hours after anyone used hot water is something else.
Neighboring equipment. In closets and garages, water heaters often share space with a furnace or air handler. A clogged AC condensate line, a water softener discharge or a washer hose can leave water on the floor that has nothing to do with the heater.
A drain pan doing its job. Some heaters sit in a shallow pan piped to a drain. A little water in the pan is the clue, not the problem. Trace it upward.
If you've dried everything and still can't find where the water comes from, the leak may be in a pipe inside a wall or under the slab rather than at the heater. A professional water leak detection check can find it without opening up walls on a guess.
Why Las Vegas Tanks Corrode From the Bottom Up
Our local supply measures about 17 grains per gallon of hardness minerals, near 290 parts per million, which the Las Vegas Valley Water District classes as very hard. Those minerals settle out as the water heats, forming a layer of sediment on the tank floor. On a gas heater, that layer sits right over the burner. Heat has to push through it to reach the water, so the steel at the bottom runs hotter than it was designed to, and over time it weakens.
The other line of defense is the anode rod, a metal rod that corrodes on purpose so the tank lining doesn't have to. In hard water it can be used up sooner than you'd expect, and once it's gone, the tank starts to rust. Our guide to the anode rod explains how it works and how often it is worth checking.
None of this means a Las Vegas water heater is doomed. It means sediment and anode wear are worth keeping an eye on more closely than in a soft-water city.
Fixable Leaks and Final Ones
Usually repairable: loose or corroded supply connections, cracked nipples, a leaking shutoff valve, a worn drain valve, a faulty relief valve, a leaking heating element gasket, and pressure problems in the house plumbing that make the relief valve open.
Not repairable: water coming from the tank body, rust-through at the base, or a tank that has bulged or deformed.
When a technician comes out, they should show you exactly where the water is coming from before recommending anything, because a slow drip from a top fitting can easily be mistaken for a tank failure.
Getting the Leak Looked At
Find the highest wet spot and you've found your leak, and more often than not it's a part rather than the tank. If you need a hand confirming it, Dr. Cool offers same-day water heater repair across the Las Vegas Valley with upfront pricing. Book online or call (702) 873-1800. If the water is spreading faster than towels can handle, the 24/7 emergency line is there for that.
Connect With Us
Our Contact Information
Reach Us by Phone or Email
If you prefer to speak directly with one of our technicians, don’t hesitate to contact us by phone or email. We’re available to assist you during business hours
Phone: (702) 873-1800
Email: info@drcoolservices.com
Business Hours:
Mon – Fri: 7:00 am – 9:00 pm
Sat – Sun: 8:00 am – 5:00 pm